
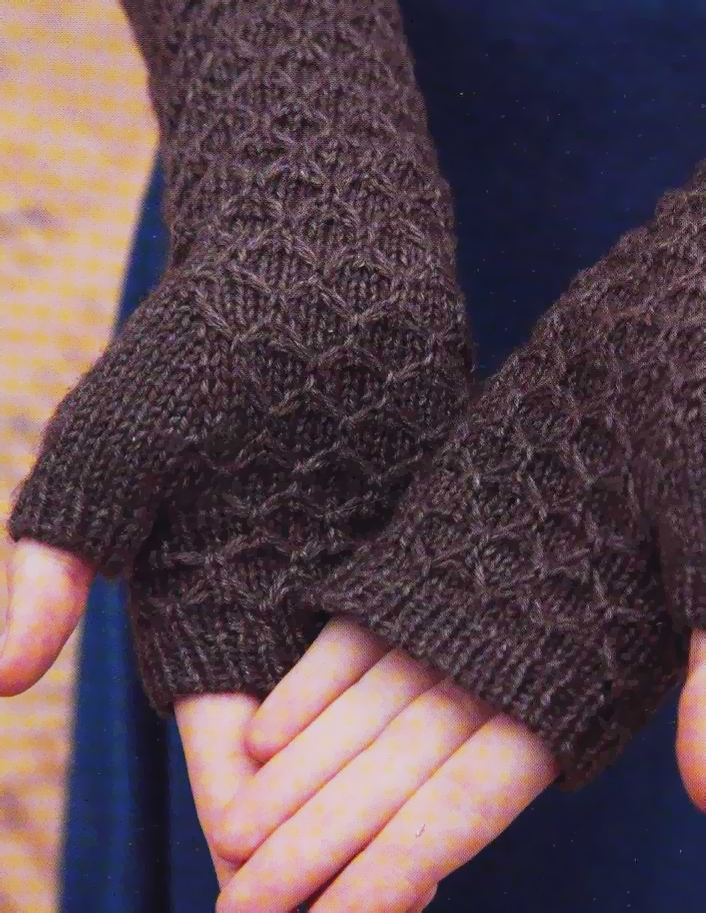
You may or may not have musical talent, but either way, you certainly can make yourself a smart pair of mitts wor-thy of wearing to the performance. The mock honeycomb pattern is very simple to memorize and moves along rather quickly in the round. This is the perfect project for that luxury skein of yarn you’ve been holding on to for a special occasion.
FINISHED SIZE
6″ (15 cm) hand circumference (will stretch to about 71/2″ [19 cm)) and 101/2″ (26.5 cm) long.
YARN
Sportweight (#2 Fine).
SHOWN HERE: Bijou Basin Ranch Bijou Spun Lhasa Wilderness (75% yak, 25% bamboo; 180 yd [165 mJ/56 g): #01 natural brown, 1 skein.
NEEDLES
MITTS—size U.S. 3 (3.25 mm): double-pointed needles (dpn).
RIBBING—size U.S. 2 (2.75 mm): dpn.
Adjust needle sizes, if necessary, to obtain the correct gauge.
NOTIONS
Markers (m); stitch holder or waste yarn; removable stitch markers or safety pins; tapestry needle; sewing needle and matching thread; two 1/2″ (13 mm) shank buttons.
GAUGE
27 sts and 48 rnds in Mock Honeycomb patt on larger needles.
stitch guide
K1, P1 RIB IN THE ROUND (even number of sts)
ALL RNDS: *K1, p1; rep from *. Rep this rnd for patt.
K1, P1 RIB IN ROWS (odd number of sts)
ROW 1: (RS) K1, *p1, k1; rep from *. ROW 2: (WS) P1, *k1, p1; rep from *. Rep Rows 1 and 2 for patt.
MOCK HONEYCOMB (multiple of 4 sts)
Slip all sts purlwise (pwise).
RNDS 1, 3, 5: Knit.
RNDS 2 and 4: *SI 3 sts wyf, k1, rep from *.
RND 6: K1, *insert right needle tip under the 2 loose slipped strands from Rnds 2 and 4 and into the next st, knit the next st tog with the strands, k3; rep from *, to last 2 sts, k2
RND 7: Knit.
RNDS 8 AND 10: K2, *sl 3 sts wyf, k1; rep from * to last 2 sts, sl last 2 sts wyf, sl end-of-rnd marker (m), sl next st wyf (the first st of the foil rnd).
RNDS 9 AND 11: Knit to end of rnd (first st was slipped at end of previous rnd).
RND 12: K3, *insert right needle tip under the 2 loose slipped strands from Rnds 8 and 10 and into the next st, knit next st tog with the strands, k3; rep from * to last st, insert right needle tip under 2 loose strands from Rnds 8 and 10 and into the last st, knit last st tog with the strands.
Rep Rnds 1-12 for patt.
note: 9 Both mitts are worked the same and can be worn on either hand.
MITTS
Cuff and Lower Hand With smaller dpn, CO 46 sts. Place marker (pm) and join in the round, being careful not to twist sts. Work in k1, p1 rib in the rnd (see Stitch Guide) until cuff measures 11/2″ (3.8 cm). Change to larger dpn. Work Rnd 1 of mock honeycomb patt (see Stitch Guide) and at the same time dec 6 sts evenly spaced-40 sts rem. Continue in mock honeycomb patt until 66 patt rnds have been completed, ending with Rnd 6 of patt—piece measures 7″ (18 cm) from CO.
Thumb Gusset
note: The gusset sts between the thumb markers are worked in St st; maintain the mock honeycomb patt as well as possible on each side of the gusset.
SETUP RND (RND 7 OF PATT): K21, pm, k1, pm, k18-1 gusset st between m.
INC RND: Work in patt to first gusset m, sl m, M1 (see Techniques), knit to next gusset m, M1, sl m, work in patt to end-2 gusset sts inc’d. Work 1 rnd even in patt. Cont in patt, rep the shaping of the last 2 rnds 7 more times-17 gusset sts between m, 56 sts total.
NEXT RND: Work in patt to first gusset m, remove m, place 17 sts on holder, remove m, CO 1 st over gap using the backward-loop method (see Techniques), work in patt to end-40 sts.
Upper Hand
Cont in established patt until Rnds 1-12 of mock honeycomb patt have been worked a total of 8 times, then work Rnds 1-6 once more-102 patt rnds total; piece measures 10″ (25.5 cm) from CO. Change to smaller needles. Knit 1 rnd, inc 6 sts evenly spaced-46 sts. Work in k1, p1 rib in the rnd for 4 rnds—piece measures 101/2” (26.5 cm) from CO. BO all sts using the tubular k1, p1 rib BO method (see Techniques).
finishing
Thumb
Place 17 held thumb sts on larger dpn and distribute as evenly as possible on 3 dpn. Join yarn to beg of sts with RS facing.
NEXT RND: K17, pick up and knit 1 st from base of st CO across thumb gap-18 sts. Knit 1 rnd. Work k1, p1 rib in the rnd for 4 rnds. BO all sts using the tubular k1, p1 rib BO method. Work second thumb in the same manner.
Button Tabs (make 2)
With 2 smaller dpn, CO 9 sts. Working back and forth in rows, work in St st for 4 rows. Change to k1, p1 rib in rows (see Stitch Guide) and work in rib pan until tab measures 21/4″ (5.5 cm) from CO, ending with a WS row.
DEC ROW: (RS) Ssk, work in patt to last 2 sts, k2tog-2 sts dec’d. Cont in pan, rep the dec row on the next 2 RS rows, then work 1 WS row even-3 sts rem.
DEC ROW: (RS) Ssk, work in patt to last 2 sts, k2tog-2 sts dec’d. Cont in pan, rep the dec row on the next 2 RS rows, then work 1 WS row even-3 sts rem.
NEXT ROW: (RS) SI 2 sts as if to k2tog, k1, pass 2 slipped sts over-1 st rem. Cut yarn and fasten off last st. Work a second tab in the same manner. Block mitts and button tabs. Weave in ends. Try mitts on and use removable markers or safety pins to position button tabs at CO edges of mitts where they look best to you. For the mitts shown, the tabs are attached to the pinky side of each mitt, opposite the thumb gussets. Fold the St st section of each tab around the CO edge of the mitt so only the ribbed portion of the tab shows on the RS of the mitt. Using sewing needle and thread, sew CO edge of each tab invisibly to WS of mitt. Sew a button about 1″ (2.5 cm) from the pointed end of each tab as shown, sewing through both layers of the tab and mitt.
.